CREATE YOUR FIRST JIRA WORKFLOW LIKE A PRO
Creating a Jira workflow seems like a simple task at first, but it is actually much more complex than it appears.
Indeed, we tend to want to break the work down to the smallest detail, represent an entire process in every aspect, and add rules, transitions, and custom fields that complicate the workflow and, over time, become a source of errors and team non-compliance.
While the best practice is to leave workflow design to an expert who can guide you and translate your work process into a Jira workflow, in some cases, you may have no choice but to do it yourself. Let's look together at how to build an efficient workflow, avoiding the pitfalls among the dozens of possibilities offered by Jira!
Defining a Definition of Done
Before starting to design a workflow, the first step is to agree within the project team on what "Done" means, i.e., the outgoing state of the workflow. This is called the Definition of Done (or DOD). This step is crucial because it defines what the team considers as the last step that closes the work process: Is a ticket tested in a specific environment a "Done" ticket? Is a ticket developed a "Done" ticket?
See our article "Definition of Done" for more details on the subject.
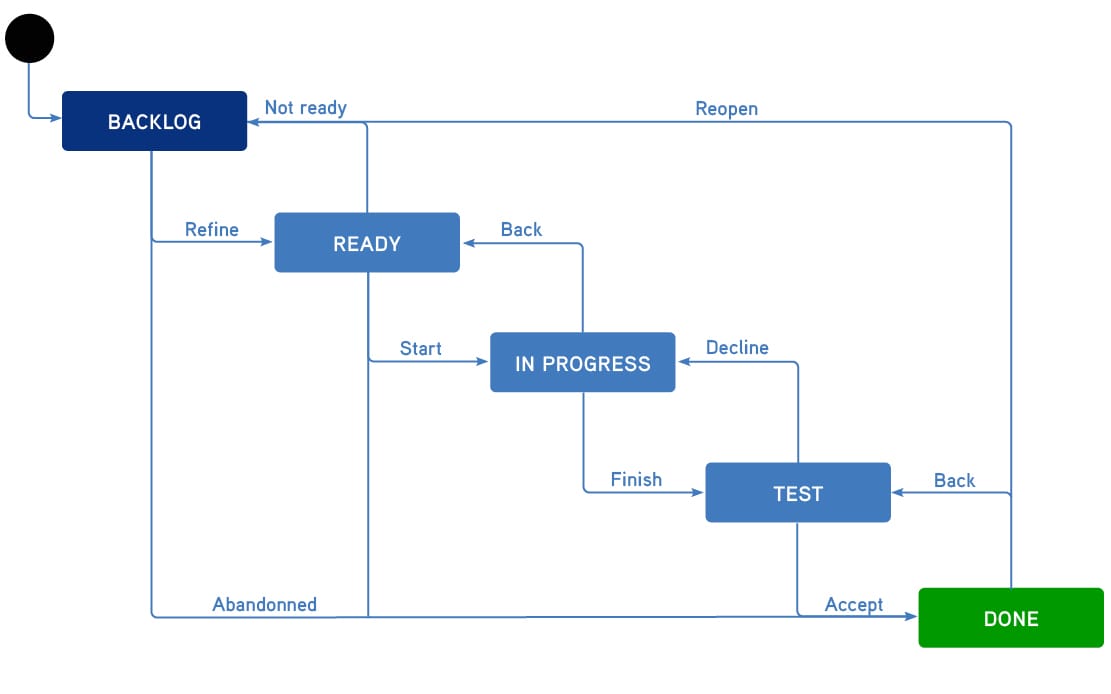
One Entry Point, One Exit Point, No More, No Less
You might be tempted to create a workflow with multiple exit points. A “CANCEL” status for tickets that get canceled along the way, a “DONE” status for those that go all the way through, and perhaps other statuses specific to your way of working—since Jira allows it, why not take advantage of it?
While the need to track the cancellation rate and completion rate of tickets is legitimate, multiplying workflow stages can quickly overload and complicate your daily work tool. The best approach is always the simplest: adopt a single entry point and a single exit point. The issue of tracking the reasons for closure can be managed with another concept in Jira (i.e., resolution).
Clear, Concise, and Reusable Nomenclature
It is important to place significant focus on the nomenclature of statuses, as well as transitions. Your workflow needs to be clear, concise, and understandable by everyone—especially the team that will use it, but also new hires (don’t underestimate turnover and onboarding). The best user experience is one that doesn’t require explanation! The workflow should be simple, intuitive, and each label should clearly indicate the action or state it represents. Don’t hesitate to have someone outside your team test your workflow.
For example: “In Progress” / “To Test”
1/ Be Clear & Concise:
Choose a simple label: ideally one or two words, as short as possible, because you have to consider the space it will take up across the interface and potentially for users with small screens. However, conciseness should not harm understanding: avoid abbreviations or terms specific to the company’s activity.
2/ Stay as Generic as Possible:
When creating a workflow, there is a natural desire to customize, and we tend to use precise terms. However, when we take a step back and look at different types of activities, there are always common phases: preparation, validation, implementation, testing... whether for software development, a marketing campaign, or the machining of a car part. So, it’s important to use generic terms that allow different departments to reconcile, providing a consolidated view of projects and progress at both macro and micro levels, which is the true power of Jira.
3/ Create States and Transitions in English:
You might be tempted to create a French-only Jira and ignore English, but this would overlook the fact that the native version is in English and that Jira has a translation system that should ideally be used. Additionally, if your business grows and you eventually need to work in English, you’ll have to redo everything. So, it’s better to create your statuses and transitions in English from the start and then add French translations through the admin interface.
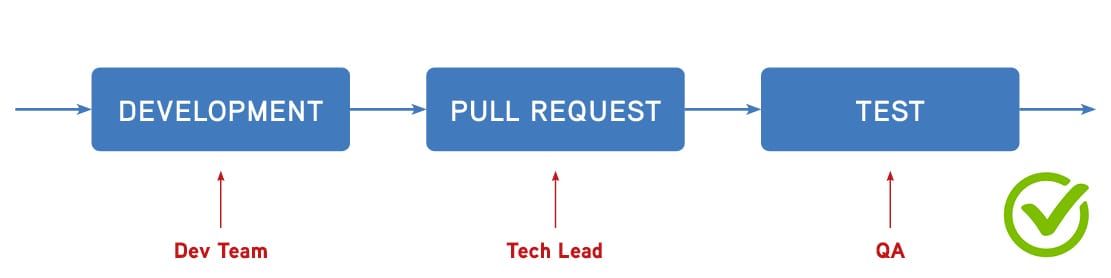
4/ A State = An Actor + An Action
To define your workflow, start with your work process and define a workflow state each time a task changes hands between actors. An actor represents a specific role within your organization who performs one or more tasks in your work process (e.g., Tech Lead, Developer, QA, Business Analyst, Product Owner...).
This approach helps keep the workflow lighter, less time-consuming for teams to update, and sometimes more easily automatable. Never forget that a simple, well-maintained workflow that’s always up-to-date is far better than a complex workflow that requires constant maintenance.
For example, in a small software development team’s workflow, you might be tempted to separate the tasks a developer performs: development, feature testing, and the pull request. However, these three tasks fall under the “Developer” role, so a single state—“In Progress”—is sufficient.
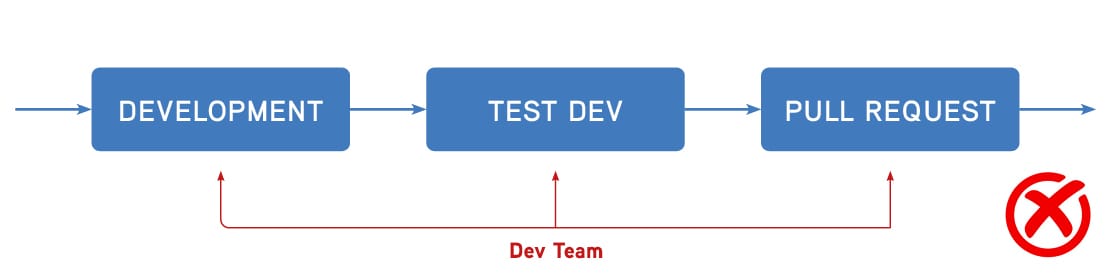
However, if pull requests (or merge requests) are always reviewed by a Tech Lead who gives approval, it might make sense to create a specific status for that task, which would fall under the “Tech Lead” role.
5/ Don’t Multiply Synonymous States
Over time, one term will resonate more with a user than another, and new workflow initiatives with similar states may appear (“In Development”, “In Progress”, “Ongoing”, etc.). At this point, be vigilant and avoid the proliferation of synonymous states. It’s better to discuss and converge on a term that will make sense to everyone. The best example is the closure status, which, depending on the team, may be “Finished”, “Completed”, “Closed”, or “Done” (for those who created their statuses in English). This initiative may seem trivial, but when Jira projects multiply, it becomes difficult to find all tickets closed in the past month because you need to aggregate many different statuses in your Jira instance. Additionally, this status proliferation, combined with other (bad) practices, will tend to slow down your Jira instance over time.
On the other hand, using shared “generic” states (e.g., “To Do”, “In Progress”, “Testing”, “Done”) is generally a good practice, but this should not apply to all workflow statuses. Indeed, certain steps specific to a work process cannot be standardized, and it’s not advisable to adapt them. Be careful, because modifying an already existing status (e.g., renaming) will affect ALL workflows using that status.
IMPORTANT: If you use several Atlassian products, such as JSM (Jira Service Management) and Jira, by default, Jira uses different statuses between the two products to represent the opening and closing states of the workflow. It’s important to keep this distinction and not overly simplify your workflow statuses. It's crucial to maintain the separation between the two products, which serve different purposes and are used by different types of users.
Workflow Design
Step 1: Place the different workflow stages (statuses) on your design page. Considering all the recommendations outlined earlier, you should have around 6 to 8 statuses in most cases.
Note: For each status between the open and close status of the workflow, you can create anchor points for transitions to visualize the upcoming transitions: in green, the outgoing transitions that move the Jira ticket to another status; in blue, the incoming transitions.

Step 2: Arrange the statuses in their order of occurrence like a staircase, and start drawing the various transitions between them.
Step 4: Attach screens to certain transitions to gather desired information. For example, you might set up a “Resolution Screen” to collect resolution information, the fix version, or time spent on the ticket.
Step 5: Add rules to your transitions to secure, solidify, and/or automate your workflow. This is the full power and advantage of Jira, and it would be a mistake not to take advantage of it. However, these options should be experimented with and tested, and they should not be applied during a development sprint to avoid disrupting the team. These rules can ensure that certain information is completed, prevent certain actions from being taken by specific roles, automate the filling of fields based on the user performing the action, trigger actions based on previous actions, and much more.
Be careful, though, not to overcomplicate things: we can never emphasize enough to start simple, see how a team adapts to the workflow, and make adjustments iteratively based on the challenges encountered.
Additionally, locking a workflow can become difficult for teams to manage and a real problem if a key team member (role) is absent or sick. These possibilities should be considered during workflow design.
In Conclusion, Keep It Simple!
Designing a Jira workflow is an exercise that requires maturity, perspective, and a solid understanding of Jira and certain concepts. We often assume that the person best suited to build a workflow is from the team that will use it, but in reality, it’s often more effective to have it audited by an external person, ideally an expert in Atlassian solutions, who can help translate your business and working methods into an efficient workflow.
In all other cases, if you have to do it yourself, keep it simple, start small, and enrich it as you go along.